Prevent Acid Redux with Redux Toolkit
An introduction to some much needed medicine

Want to learn how to manage a single source of truth for your application?
This post is going to help you get rid of the acid Redux associated with trying to use vanilla Redux.
Acid Redux, for those who have never suffered it, is when you attempt to learn vanilla Redux and you start drowning in indigestion, trying to figure out the complexity and boilerplate. Maybe that's not exactly how it happened to me, but I prefer Redux Toolkit (RTK).
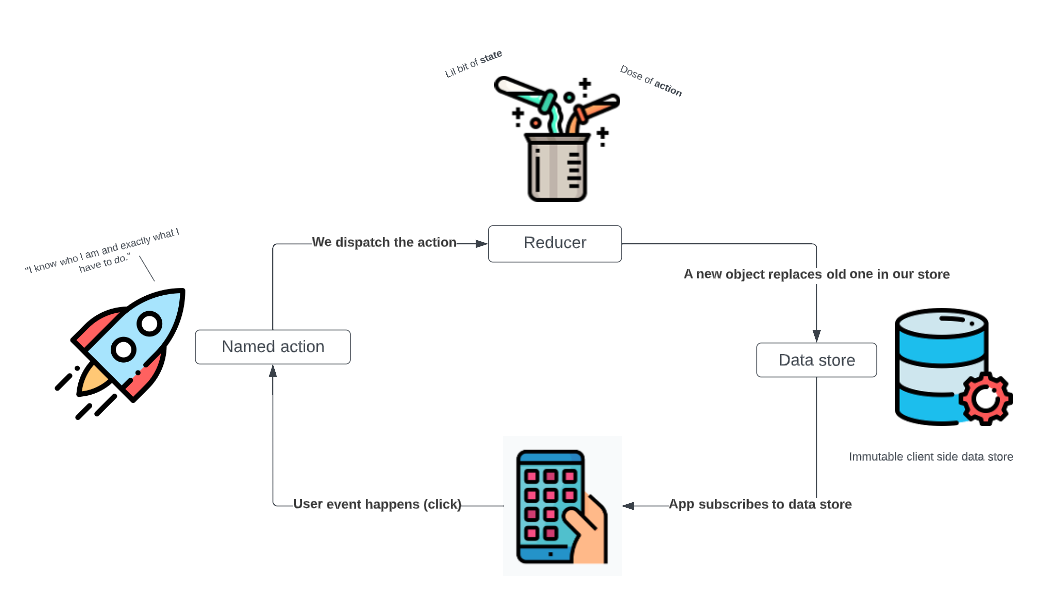
What is Redux
Redux Toolkit is a tool that abstracts a lot of the heavy lifting associated with Redux.
Before that let's dig into what Redux is and who gave it to us.
Redux is an immutable way to manage state across an application and to keep track of what happened and when.
This means any change to your app's state has to be intentional. And with each response of each action, we can keep track of when and where these responses to action happened.
For the time travel part, check out the bottom of this article to see a video of Dan Ambramov himself talking about it. We'll be looking at how to use Redux via Redux Toolkit later in this article.
When people ask me what Redux is, this is my response - a one-way circuit for users to affect data within an application in a clean, predictable manner.
Who gave us Redux?
Dan Abramov and Andrew Clark brought Redux to the world in 2015 and since 2016 the primary maintainers are Mark Erikson and Tim Dorr.
Abramov was working on a talk about hot reloading for a conference at React Europe. He's quoted on how the thought of Redux came to be:
"I was trying to make a proof of concept of Flux where I could change the logic. And it would let me time travel. And it would let me reapply the future actions on the code change. I was thinking about Flux as a reduce operation over time... your stores, they accumulate state in response to these actions. I was thinking of taking this further. What if your Flux store was not a store but a reducer function?"" - Dan Abramov
In other words, Abramov was taking lessons learned with Flux, which is a way to build a single page application Facebook developed, and apply it to a data store. But going beyond that, instead of being a data store, how could it be a reducer function?
Before Redux we would have to prop drill which one layer deep is fine, but passing props to 5-6 layers deep to components is a chore.
Why state management?
It's no surprise for anyone new to React that state can slip away from you after each render. React components work in harmony with one another with previous and next state and unique keys to keep state in check with each other. React, or any other JS library is great about only rendering what needs to be rendered. What if you could hook your app up to a brain and that was the source of truth and knowledge for your app? State management libraries like Redux are great for that. Before state management libraries were a thing we would have to prop drill. Meaning going down many layers of components to pass information to a great, great, great-grandchild component. You can see how much of a chore that becomes, not to mention some other state can slip away in that scenario.
Reducers are the future
Some of you have seen the word reducer in programming or even used it with a Redux application. Conceptually speaking a reducer looks like this:
const reducer = (currentState, action) => newState;
A reducer takes in the current state and an action as two arguments. Then it gives you a brand new state based on those two things. In other words, we are dictating through the action how we are going to affect the state. And then we are given a brand new state to use. This becomes our source of truth for other functions, actions, components for the rest entire app, etc...
For a deeper dive into reducers in JS, I recommend this stellar article by Reed Barger.
Mutate safely
Before RTK we would want to spread state and our modified value like this:
Reducing the old way
const subtractCountBy = (state, action) => {
    const newNumber = state.value - action.payload
    return {
        ..state,
        ... {
            value: newNumber
        }
    }
};
Thanks to RTK when we create a slice via createSlice, it handles merging our changes into state for us via useReducer. So we can mutate state safely without a care in the world like so:
Reduce RTK the new way
const subtractCountBy = (state, action) => {
    state.value -= action.payload;
};
Enough of the brief history lesson, now let's go over how we use Redux Toolkit to be the brain of our app.
Using Redux Toolkit
First, install redux toolkit into your application:
npm install @reduxjs/toolkit react-redux
Note I'll be copying and pasting from the official docs, but adding flavor where I can. Also, you can use TypeScript, but to present the process to a larger collective, I'll be using JS.
Then we need to create the store for our app to use. Name it store.js:
app/store.js
import { configureStore } from '@reduxjs/toolkit'

export const store = configureStore({
  reducer: {},
})
This creates a Redux store and allows to view what's in the store via the Chrome Redux Dev Tools extension.
Now we will connect our components to the Redux store by wrapping a provider around it with the store as a prop.
index.js
import React from 'react'
import ReactDOM from 'react-dom'
import './index.css'
import App from './App'
import { store } from './app/store'
import { Provider } from 'react-redux'

ReactDOM.render(
  <Provider store={store}>
    <App />
  </Provider>,
  document.getElementById('root')
)
Now we are ready to create a slice. Not a pizza slice, but a slice of data that will be an ambassador to our data store. This slice will have its JS file dedicated to the initial state and the actions to do transactions with that slice.
I like to co-locate my slice with the main component that will be utilizing its actions. In this case, we are putting the counterSlice.js file into the counter folder, within the features folder.
features/counter/counterSlice.js
import { createSlice } from '@reduxjs/toolkit'

const initialState = {
  value: 0,
}

export const counterSlice = createSlice({
  name: 'counter',
  initialState,
  reducers: {
    increment: (state) => {
      // Redux Toolkit allows us to write "mutating" logic in reducers. It
      // doesn't actually mutate the state because it uses the Immer library,
      // which detects changes to a "draft state" and produces a brand new
      // immutable state based off those changes
      state.value += 1
    },
    decrement: (state) => {
      state.value -= 1
    },
    incrementByAmount: (state, action) => {
      state.value += action.payload
    },
  },
})

// Action creators are generated for each case reducer function
export const { increment, decrement, incrementByAmount } = counterSlice.actions

export default counterSlice.reducer
Let's break this file down a bit before moving forward:
features/counter/counterSlice.js
import { createSlice } from '@reduxjs/toolkit'
We are importing the createSlice function provided by Redux Toolkit. According to the docs, this function accepts the following:
- an initial state
- an object of reducer functions
- a "slice name"
Then it automatically generates action creators and action types that correspond to the reducers and state. In other words does a lot of the wiring up for us to make transactions with our store via the slice.
features/counter/counterSlice.js
const initialState = {
  value: 0,
}
We make a const called initialState whose value is an object that stores key/value pairs for us.
The initial state is set when the user first interacts with the app. Only when an action is dispatched will this value change.
features/counter/counterSlice.js
export const counterSlice = createSlice({
**  name**: 'counter',
**  initialState**,
**  reducers**: {
    increment: (state) => {
      // Redux Toolkit allows us to write "mutating" logic in reducers. It
      // doesn't actually mutate the state because it uses the Immer library,
      // which detects changes to a "draft state" and produces a brand new
      // immutable state based off those changes
      state.value += 1
    },
    decrement: (state) => {
      state.value -= 1
    },
    incrementByAmount: (state, action) => {
      state.value += action.payload
    },
  },
})
Here we are using the createSlice method we imported higher up in the slice file. We are then passing 3 arguments:
- the name of what the slice should be referred to in or app
- the initialState object we made earlier
- the reducer(s) (or action(s)) we want to create and later affect change to our data store
You can see we are preparing 3 reducers named increment, decrement, and incrementByAmount.
The first two reducers are simple actions that take no value from the user. We are just simply passing in the current state and changing that state directly by either adding or subtracting by 1 increment.
The 3rd reducer incrementByAmount takes in the current state, and an action we want to do. The payload (or result) of that action is then assigned to the value property in our state.
features/counter/counterSlice.js
export const { increment, decrement, incrementByAmount } = counterSlice.actions
Then we are make the 3 reducers we created higher up in the file available to the entire app by destructing the actions property on the counterSlice const we made.
features/counter/counterSlice.js
export default counterSlice.reducer
And finally, the piece of the slice we want to automatically make available by default when importing this file is the reducer property RTK made for us.
Checking in on you: are you good? Need some water? It's not complicated, stick with me :D
Let's bounce back to our store and let it know we have some reducers it can expect:
app/store.js
import { configureStore } from '@reduxjs/toolkit'
import counterReducer from '../features/counter/counterSlice'

export const store = configureStore({
  reducer: {
    counter: counterReducer,
  },
})
Now here is where we read from our store and change the data to our store. The grand finale to this not-so-complex workflow.
Create a Counter.js file that will host an increment button, a decrement button, and something to render the value of the counter.
features/counter/Counter.js
import React from 'react'
import { useSelector, useDispatch } from 'react-redux'
import { decrement, increment } from './counterSlice'

export function Counter() {
  const count = useSelector((state) => state.counter.value)
  const dispatch = useDispatch()

  return (
    <div>
      <div>
        <button
          aria-label="Increment value"
          onClick={() => dispatch(increment())}
        >
          Increment
        </button>
        <span>{count}</span>
        <button
          aria-label="Decrement value"
          onClick={() => dispatch(decrement())}
        >
          Decrement
        </button>
<span>
 <input
          value={incrementAmount}
          onChange={e => setIncrementAmount(e.target.value)}
        />
        <button
          onClick={() =>
            dispatch(incrementByAmount(Number(incrementAmount) || 0))
          }
        >
          Add Amount
        </button>
</span>
      </div>
    </div>
  )
}
Let's go over this line by line, and then we'll be wrapping up.
features/counter/Counter.js
import { useSelector, useDispatch } from 'react-redux'
import { decrement, increment } from './counterSlice'
Here we are importing two hooks and two actions. The first pair of imports comes from 'react-redux' and the second pair comes from our counterSlice slice file.
useSelector is a nice hook that lets the component monitor the value we assign to our const.
Let's look a bit further down and see how we use it in the component:
features/counter/Counter.js
const count = useSelector((state) => state.counter.value)
We invoke the useSelector which is equivalent to the mapStateToProps to connect our component to the data store. If you don't know the mapStateToProps process, it's the vanilla equivalent of using this hook, but more complex and lengthier to do. Thanks to RTK we have useSelector.
So the const count now fetches the state from the store and returns the value of value.
Let's get back to our imports and look at useDispatch. useDispatch is what we use to call the reducer(s) that we've made in our counterSlice. Since we've exported them, we are importing them here.
Jumping further into the component code check this out:
features/counter/Counter.js
const dispatch = useDispatch()
Here we are just saying the const dispatch is the useDispatch hook.
This is how we will change our app's state so all components can be made aware.
features/counter/Counter.js
<button
          aria-label="Increment value"
          onClick={() => dispatch(increment())}
        >
...
<button
          aria-label="Decrement value"
          onClick={() => dispatch(decrement())}
        >
          Decrement
        </button>
...
 <button
          onClick={() =>
            dispatch(incrementByAmount(Number(incrementAmount) || 0))
          }
        >
          Add Amount
        </button>
We assign the onClick attributes to an anonymous function that fires the dispatch hook and takes the action function we designate along for the ride.
Notice how we are passing the state variable incrementAmount to the incrementByAmount reducer? This is where our reducer is seeing a specified action, making the action happen, and returning the payload so we can make a new state object for our store to use.
Then finally in our span element, we are using the count const to show the real-time value of the property value in our store.
features/counter/Counter.js
<span>{count}</span>
For a full working app of what we've covered in this article, check out the sandbox from RTK here.
Hot dang, you read this far? Congrats
In summary, you've learned about what Redux is, where it started and how it's been made even easier to use thanks to Redux Toolkit. I know it was a long read, but thought it would be helpful to cover line by line.
I hope you try using RTK in your next application and discover what it's like to have a source of truth for all your components in your app. It makes development much faster once you get used to using it.
For bonus points, I recommend reading up on the produce method from immer, with RTK, to analyze/change/replace state before it even hits the data store. Thankfully immer, an immutable library, is already included with your RTK install.
Other items to check out:
- Dan Abramov - Live React: Hot Reloading with Time Travel at react-europe 2015
- Redux in 100 Seconds
- What Is a Reducer in JavaScript? A Complete Introduction with Examples
- Redux Toolkit Docs
- Redux Wiki
Thanks for reading! Please let me know if I've presented any information incorrectly in the comments below (or kudos are appreciated too).